My students love math centers! They are always excited when they see math centers on our Daily Schedule. I love to watch the engagement during our math centers, and I have been experimenting with a more open-ended approach and letting them make decisions! This post is all about how I teach my 2D and 3D Geometry using centers and open-ended activities.
At the end of the post is a link to my post about how I teach Patterning. If you enjoyed this post and the ideas shared, then you should definitely check out that post too.
At the end of the post is a link to my post about how I teach Patterning. If you enjoyed this post and the ideas shared, then you should definitely check out that post too.
Launching Your 2D Geometry Unit
When teaching Geometry, I like to teach 2D shapes before 3D and not the reverse. I always start off by giving students a shape and having them tell everything they can about that shape just to see what vocabulary they use and what they know. Here is our finished anchor with their thinking about these shapes.
Another great way to launch this unit is to go on a shape scavenger. We used our class Ipads and walked around our school taking pictures. Afterward, they sorted their shapes and created a Pic Collage with 2 or more of each shape (square/circle/rectangle/triangle). Print off the Pic Collage for a technology inspired display. Another idea is to print them and then cut them out and have students sort them to create an anchor chart of real-world objects that are a particular 2D shape.
After this lesson, we did some whole group investigating and I drew out language related to the shapes. They all get so hung up on describing by colour and size, so we learn about corners/vertices and edges/sides. I add these words to our Math Word Wall in my star chart, and I go over our learning goals for the unit.
After this lesson, we did some whole group investigating and I drew out language related to the shapes. They all get so hung up on describing by colour and size, so we learn about corners/vertices and edges/sides. I add these words to our Math Word Wall in my star chart, and I go over our learning goals for the unit.
Using Geometry Centers to Let Students Show You What they Already Know
Usually at this point, I would get them busy with some paper/pencil tasks about shapes, but this time I decided to jump right into centers and give them some challenges to see what they could do. I aligned the centers to the specific curriculum expectations so that I could be doing an on-the-go assessment as they used the centers.
I was able to cover the following specific expectations with these centers:
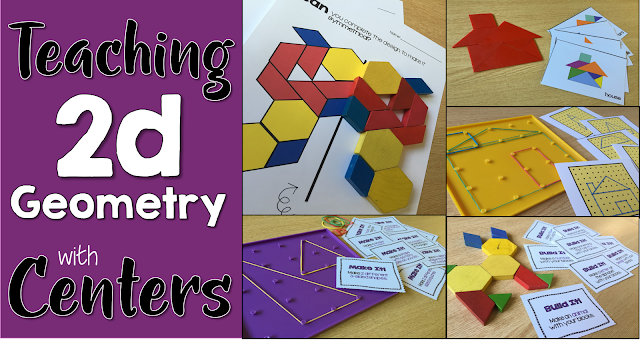
At one center, the students were given a piece of construction paper and the shapes, and they could create whatever they wanted from the shapes. Another option was to take a task card and complete a design with either pattern blocks or 2D shapes.
- Identify and describe common 2 shapes and sort and classify by their attributes
- Compose patterns, pictures and designs using 2D shapes
- Identify and describe shapes within shapes
- Cover outline puzzles with 2D shapes
- Exploring symmetry
At one center, the students were given a piece of construction paper and the shapes, and they could create whatever they wanted from the shapes. Another option was to take a task card and complete a design with either pattern blocks or 2D shapes.
The next, more open-ended center, was a pattern block center where students created a design of their choice and then recorded the blocks they used. There was a bit of a learning curve here as some realized elaborate designs were hard to record. Most were able to find a happy medium and came up with some excellent creations.
The geoboard center was probably the most exciting. There are two options here. Students could use a task card and create it on the geoboard or take a geoboard picture card and try to recreate it. Afterward, free exploration on the geoboards leads to lots of great learning too!
This center challenged them to sort shapes by any attribute they choose. I provided shapes for them but also had real shapes to use as well. This showed a lot about their understanding of the attributes of shapes.
.
The final center was to explore symmetry. Pattern blocks are awesome to use to create symmetrical designs. I often use a straw as a line of symmetry if they are building right on their desktop.
The best thing about getting them right into the centers was the opportunity to watch them as they problem solved through the different tasks. The level of engagement was amazing. On day 2 of our centers my principal, former supervising principal and new supervising principal visited. When important visitors walk in it can be somewhat stressful but everyone was doing exactly what they were supposed to be doing and loving it, so my stress level was reduced.
How to Document Student Learning During Centers without Worksheets
Most of these activities do not require any worksheet or paper/pencil followup. Instead, my students are trained to take photos of their learning and add it to their digital portfolio in Seesaw. Click below to learn more about Seesaw.
I love that I am able to scroll through my feed and see what everyone was doing while I was working with individuals and small groups. They love to take pictures, so they are more accountable for finishing their task and getting a chance to use the iPad to take the picture.
I now have a folder of photo evidence to show that they are able to meet the expectations without reams of paper-pencil tasks and I can show these to parents as well. If you like the centers I have shared you can check them out by clicking here:
Are you looking for a digital option? Many teachers are transitioning to a more digital environment in the classroom with tech. This resource is now available for Google Slides. This video shows the activities in a digital format.
You can find this resource here:
2D Geometry Activities for Google Slides
Add some problem solving opportunities to your 2D shapes unit with digital or print resources to solve problems with pattern blocks.
Teaching 2D geometry first makes 3D geometry a breeze! I use very similar centers from my 2D unit to provide practice with 3D shapes. It helps students to be able to be independent right the outset.


.png)


These look like fantastic activities!! I love that you just let the kids dive right in... that's the best way to get at their thinking!
ReplyDelete~Erin
Mrs. Beattie's Classroom
You are right about that! Thanks for stopping by!
DeleteSuch a creative lesson! I absolutely love all of the hands on components that you have incorporated with this lesson. I can imagine that your class is an exemplary example of how student engagement should look!!!
ReplyDeleteThese centers look like so much fun! I wish I was in first grade!! I love how you have the kids add to the anchor chart- that is a different way to do it other than just call and record like we do! I am going to have to try that out this week!
ReplyDeleteThanks for sharing!
Love Always, Diana Lynn
I love these activities! What grade is this meant for?
ReplyDeleteLOVE THIS ARTICLE! I am going to teach a lesson on geometry in my fieldwork Kindergarten class! I feel more confident that I can create a great lesson! Thank you so much for the ideas!
ReplyDelete