Introducing the Snowball Saver! What is a snowball saver? Well, we have spent the last two weeks working with the book The Snowy Day. As you will know, near the end of the story Peter's snowball melts, after he leaves it in his coat pocket. My first graders giggled and said that Peter was really silly to put it in his pocket. This lead to a discussion about what he could have done instead. There were lots of suggestions that he should have put it in the freezer.
This got me thinking about how to turn this wondering from my students into a challenge we could work on. We spent some time talking about how we could keep a snowball in our classroom. Could we make something to store it in? My students paired up and started brainstorming what they could make or build. Some of their ideas were crazy and far fetched, like building a refrigerator and using concrete blocks to build a cold room in the classroom. I figured I needed to help them be slightly more realistic in their thinking. To do this we watched a great little video about making a "keep a cube" container, which is essentially the same thing. Here is the link to the video on Youtube:
This got them moving in the right direction. I sent home a note to families with a few suggestions that most of the students came up with and then they added items to the list if there were other things they needed from home. This ensured we had a good selection of found materials to build with.
This morning I set out the collection I brought in. I knew some would forget and some would not have anything to contribute. Many children did contribute the class collection and we ended up with many more materials with which to build.
We gathered on the carpet and I went over the steps we were going to follow in order to be real scientists investing the problem or challenge: Can you keep a snowball from melting in our classroom? The first thing partners did was gather their materials and make a materials list.
Once partners were done with planning out their Snowball Savers they got to work creating it. This part was fun but very messy. There was paper, foil and lots of other random things everywhere, but everyone was engaged and they were having a blast.
Now that the Snowball Saver was ready it was time for the snowball. Up until this point the snowballs were all sitting in a cooler outside staying cold. Before they were able to put them inside their Snowball Saver, they needed to measure the diameter of their snowball so they had something to reference at the end, if the snowball did not melt. They loved handling the cold snowballs and were very gentle so that they did not break apart.
As soon as students got their snowballs I put our "control" snowball in a dish in the classroom. We needed to see how fast it melted out in the open in order to compare to our protected snowballs.
After the snowballs were safely tucked away it was time to draw a labeled diagram of the Snowball Saver. Next, partners wrote the steps they followed in order to build their Snowball Saver, just like a real scientist.
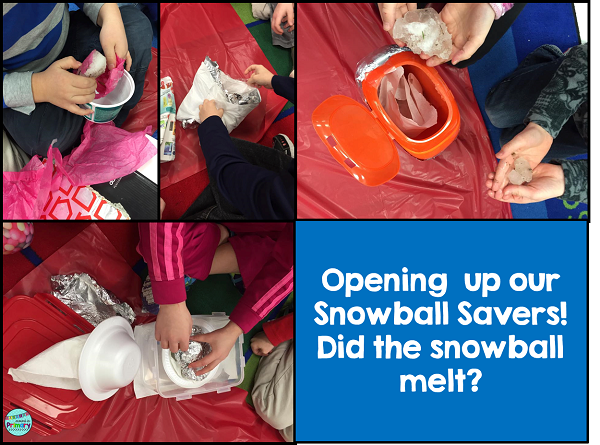
This process took us all morning. Two hours after we started we took a look at our "control" snowball and it was almost melted, so it was time to check on our Snowball Savers. The results might surprise you! The results certainly surprised them.
Almost all of the snowballs were still intact and only a few had started to really melt. We decided if there was water in the container or on the wrap that they used around it then it was melting. They were totally blown away by the results. Only 1 of the Snowball Savers had a fully melted snowball.
This is the one that showed no signs of melting. It generated a lot of conversation as did the ones where the snowball was wrapped up with multiple layers of things like waxed paper, plastic wrap, newspaper, tinfoil etc. Why did the snowball in a styrofoam container not melt at all? How about the ones wrapped in of layers? Lots of great questions were asked.
I deem this project a total success. It incorporated so many aspects of the curriculum and generated amazing conversation with the students. It touched on the following curriculum areas:
~ measurement
~ 3D Shapes
~ Science - matter/materials/fasteners
~ Science - structures
~ Writing - writing How to, creating a labeled picture or diagram, sequencing.
Another possibility to link it to Oral Communication would be to interview students and have them explain their choices and why they think that their Snowball Saver will keep the snowball from melting.
I hope you enjoyed this peek into my room at my first STEM inquiry. This is now available in my store. Click on any of the pictures to be taken to my store.
I would love to hear your thoughts on this project. Please comment below. Thanks so much for stopping by.
Until next time,


.png)


It sounds like the kids had a wonderful day. I would love to know when you have it posted to tpt.
ReplyDeleteThey did. I am working on the file for TPT right now and will message you when it is ready to go. Thanks for stopping by. Christina
DeleteIt sounds like the kids had a wonderful day. I would love to know when you have it posted to tpt.
ReplyDeleteThis looks so fun! I will revisit when we get to the structures strand!
ReplyDelete